

Let's just say, any furniture in my house that has a wood finish....
IS NOT SAFE!
I loved transforming this wood armoire into this layered,
painted masterpiece!
And I did it without stripping, scraping or priming.
Yep...you guessed it!
Annie Sloan Chalk Paint.
(and no, I am not being paid for this endorsement)
If you don't know about this paint, I hope to
educate you a bit in this post, because this is the
first "piece of furniture" that I've painted using ASCP.
Other posts where I have used ASCP can be found here and here.

This armoire is a reproduction piece, so it isn't an antique,
but it has great carving and adornments that made it
a perfect candidate for painting in layers.
I bought it from a friend who didn't have room for it in her new home, and we had just moved in and had this big empty wall across from the bed in the Master Bedroom.
The problem from the beginning was that the wood finish didn't look so great with my "chocolate" colored walls.
And I was NOT going to change my chocolate!!!

First, open your can of paint and begin painting.
(ok, I did have to dust it and tape off the mirror)
I used the color French Linen, which is a medium grey tone. I used my new Annie Sloan paint brush that I won at the Haven conference,
and they are lovely to work with.
Paint and don't worry about the brush strokes...
these will add character later to the finish!

Next, I watered down some Old White paint and put that on over the French Linen.
I tried to leave the crevices free of Old White, but because the paint was thinner, sometimes it got in there, but no worries!
The piece was definitely looking a bit ghostly
next to the off-white trim in the bedroom...
but later, the wax would do the trick!
I then used 220 grit sandpaper, and just sanded in those places and spots that would naturally show wear and tear.
In some places I sanded down to the wood finish and in others just to the French Linen layer.
Some of the areas were: around the handles, corners and edges that could easily get bumped or nicked over the years, raised decorative areas.
Then I also picked a few random places on the side panels, just because those get scrapes too.
If you want your piece to look old, you have to study the genuinely old pieces and duplicate.

Then came the wax!
Annie Sloan makes a clear wax and a dark wax.
Annie Sloan makes a clear wax and a dark wax.
At the Haven conference, I took an advanced painting class and learned from Miss Mustard Seed that you can mix the clear and dark wax together, instead of using the clear first, then the dark.
This was great news, because it saves a step in the process.
So I scooped out 3 spoons of clear wax, 2 spoons of dark wax, then about 1 tablespoon of French Linen paint.
(you can also tint your wax with paint)
I mixed it together, and it looked alot like chocolate frosting...lol!
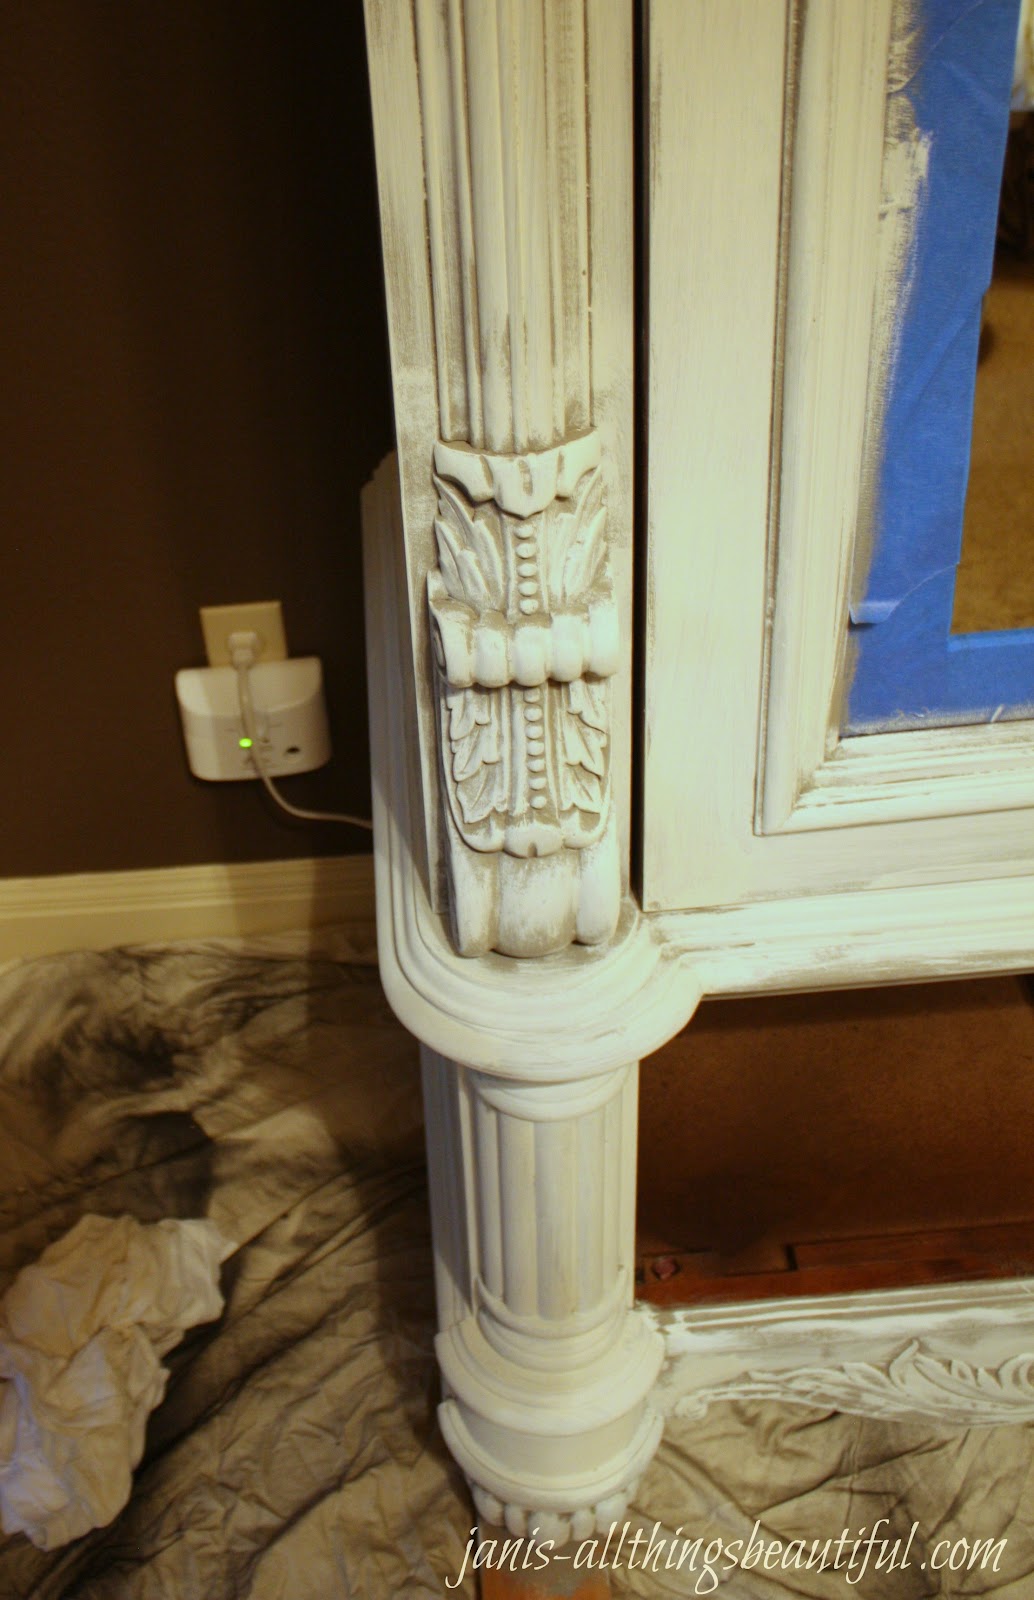
I took the largest of my handy dandy AS paint brushes, dipped it in and began slathering it on. I kept spreading it til it wouldn't spread anymore.
Then I dipped again, and as you can see in the picture above, the difference in color.
The door and left column does not have the wax applied to it yet.

After the wax dried, which doesn't take very long,
I wanted the "high" areas to show more of the white paint.
To remove some of the dark wax mixture, you simply
use some clear wax.
So I used an old white t-shirt,
dipped it in clear wax, and began rubbing those
areas that I wanted to highlight.
When you are satisfied with the colors...let the wax dry.
Then buff with a clean white t-shirt until the entire surface is smooth.
You will begin to see the sheen and no longer feel resistance.
I was blown away by the truly lovely finish the wax gave this piece.

I also painted the hardware with AS Graphite paint.
Brushed on some of my wax mixture, then buffed them as well!

Here you can see some of the details.

Here's a closeup of where I sanded to the wood, and took down the dark wax to highlight the white in these raised areas.
 Even the side is varied in color, and it doesn't have to be even.
That's the beauty of mimicking an old painted piece.

Now it pops against the chocolate walls...and it's very reminiscent of
the high-priced pieces I've drooled over in the magazines!

You did a gorgeous job Janis! I absolutely love this piece and I wish it could me in my house! You are so talented. :) Thanks so much for sharing.
ReplyDeleteCarrie
Thank you so much Carrie!! That means alot to me coming from you, because I admire your work so much! xoxo
DeleteWhere can I buy the supplies? I would love to try this great job.I tried looking up the paint names at Lowe's and Walmart and I could not find it at all. Is it furniture paint or regular paint for walls?
DeleteAnnie Sloan has different distributors in the States, just Google it for your area, you wont find it at the regular paint stores.
DeleteVery impressed, Janis!! It looks gorgeous! I'm going to have to try some of that Annie paint!
ReplyDeleteThanks Lori!!! I think you'll really love it too! We can Skype while you paint...lol! <3
DeleteThis is just beautiful and I am so glad you said to look at old pieces and study where they have worn. That is the same thing I do.
ReplyDeleteWell Kim, I am just tickled that you like it! You are such a pro with great style! Appreciate your encouraging and sweet comment!!!
DeleteOh My Gosh Janis!!! This looks amazing against that Chocolate Wall now! What a stunning piece of furniture, you did a great job! And I have to say, thank you for the step by step! Great job!
ReplyDeleteJen
Thanks Jen!!! I really do love it too! I fall in love with it every time I walk in the room...:)! You ready to paint?
DeleteGorgeous~ love how it came out! Thanks for linking up at Feathered Nest Friday!
ReplyDeleteThank you Courtney!! Glad you like it!!
DeleteThis is a masterpiece! You took an old fashioned clunky piece and turned it into one of the most beautiful pieces I have ever seen! You worked magic with ASCP and a paint brush!
ReplyDeleteI hope you will link up to TUTORIALS TIPS AND TIDBITS, my weekly linky party. Linky goes live Wednesday evening at 8:00!
Beautiful!!!!!
awwww...Yvonne, that means so much to me to hear you say that! I so appreciate your lovely comment. Thanks so much for the invite as well!!!
DeleteJanis, you did an amazing job!! It looks beautiful!
ReplyDeleteThanks Kelly! It was alot of fun for me!!
DeleteWow, again. I have a bed - head and foot, 2 nightstands and a dresser that need this treatment. Want to give me a bid? ;) Seriously, how long did it take you to complete the project? I'll triple that to figure out how long it would take me.
ReplyDeleteit took me 2 days...and I took lots of breaks!! I'm not that patient with refinishing stuff, so that's why I love this paint. It really does make it easy. Thanks Beth!!! and call me if you need more info!
DeleteBeau~ti~ful! Love love love this armoire!
ReplyDeleteThank you!!! I do TOO!, now!!!
Deletewhat a spectacular find. so elegant.
ReplyDeleteThank you...the details are lovely on this piece!
DeleteYour armoire is seriously gorgeous!! Don't tell anyone but I have never used ASCP . I need to jump on the wagon because I love what I see!
ReplyDeleteThank you so much for sharing all the details.
You will LOVE this paint!!! Can't wait to see...
DeleteOh I would so love to own this piece - absolutely beautiful!!!
ReplyDeleteAm following you now because of this piece!
Would love you to come visit and follow back
:)
Thanks so much!!!
DeleteJanis, this is so beautiful! I just pinned it. Love the french linen with the white wash. Lovely.
ReplyDeleteThank you for the pin!! I'm a fan too of French linen!!
DeleteJust found you through hometalk and now a new follower. This came out so beautiful thanks for sharing. I have been wanting to do my buffet and now I know exactlly what I want to do!
ReplyDeleteI am sooooo excited for you! It's fun to be inspired and so glad you were! Thanks for the follow!!
DeleteThis armoire came out fantastic. I saw you over on Miss Mustard Seed. I have already tested some chocolate brown paint to go over my grayish, espresso brown walls. That color's been up for 6 or 7 years, and I'm so excited to try the chocolate. I have to finish my bedroom makeover first! But Annie Sloane is on my list, and so is MMS's milk paint. DECISIONS DECISIONS ;D!
ReplyDeleteI know...sooo many great choices of paints and colors! My wall color is "tilled soil" by Sherwin Williams. It was a Martha Stewart collection color!
DeleteWOW!!!! just found your blog through a link party @ Stone Gable and I think your painting of your project piece is stunning!! WOW!!
ReplyDeletePatty @ Creative Ideas
Thank you Patty!!! The transformation still amazes me! Appreciate your kind comments!
DeleteSIGH! Thank you for sharing this at TUTORIALS TIPS AND TIDBITS! I am as amazed as the first time I saw it. A true masterpiece!
ReplyDeleteSure thing Yvonne! Love your site and your party!!! Your comments are so appreciated!!!
DeleteHi, Your armoire is such a spectacular piece. Thanks for the tutorial...Connie
ReplyDeleteThank you! I just had to show you all the step-by-step transformation...so fun!!!
DeleteIM SPEECHLESS!Just beautiful REALLY!
ReplyDeleteAwwwww...Thank you Deidre!! Glad you like it!
DeleteYOU are honestly incredible Janis, I can't get over this!!! AH-mazing!!! I adore it, the whole look!!!
ReplyDeleteGina...I love you! And thank you for your sweet encouragement!!! <3
DeleteJanis! Congrats on being in the Shaw Facebook contest! Your project looks great and your instructions are wonderful. Good luck!
ReplyDeleteJanis...this is simply GORGEOUS!!!!!!
ReplyDeleteWell done..Annie would be proud.
Janet xox
The Empty Nest
This is stunning! I am inspired to tackle a huge armoire in my shop~love it!!
ReplyDeleteHoly Moly, this is exquisite!, and i love the way you took us step by step! Thanks!
ReplyDeleteCindy
Armoire painted furniture is shown on the post here. Good post
ReplyDeleteWell, I will mimic What everyone else is saying.....This is absolutely fabulous! Great job! I love the beautiful variations in the paint. I can't imagine how beautiful this must be in real life.
ReplyDeleteLove it! I did this a long time ago by accident to my hutch. It wasn't an antique hutch, but it was old and ugly. I bought an antiquing kit (white paint and brown stain basically), and I painted the entire hutch white first...didn't wait for it to dry all the way before I started adding the stain and viola! I loved how it came out (very much like this piece of yours). I later sold the hutch for 100 bucks!
ReplyDeleteI'm currently doing this look to the bottoms of my solid wood coffee table set and staining the tops dark. Now I need an idea for my hutch (don't want to do this to the hutch because it would just be too much, I think), and I came across here. Just wanted to say, I love how yours came out!! Beautiful!
Your job is really noteworthy..i wish this piece could be mine+
ReplyDeleteDo you have any books or videos for sale?
ReplyDeleteNo books or videos in the works...but hope the tutorials are helpful. I do hope to post some other paint projects that I have lined up for summer!
DeleteThank you for this great tutorial! I will be looking for a piece to "chic" from Garage Sales this summer :) Thank you
ReplyDeleteOmg! This is amazing! I had yet to come across the perfect finish until now. Only one question, i am looking to do something very close to this to my bedroom furniture and was wondering the amount i need to water down the paint or how much to add to the wax... Any chance u could email me please :) im a huge fan of your work. Beautifuly done!
ReplyDeleteMelissa.mesta@gmail
Omg! This is amazing! I had yet to come across the perfect finish until now. Only one question, i am looking to do something very close to this to my bedroom furniture and was wondering the amount i need to water down the paint or how much to add to the wax... Any chance u could email me please :) im a huge fan of your work. Beautifuly done!
ReplyDeleteMelissa.mesta@gmail
Wow,
ReplyDeleteJust found your site through a linky party. What an amazing transformation.
Love it. Thanks for sharing. Pinned
Sarah
where do you get the wax from?
ReplyDeleteFor this project I used Annie Sloan clear wax and the dark wax. Her products are sold by local distributors or online. I have also used a clear paste wax on other projects that I bought at a home improvement store. Those tend to be a little stiffer, but provide a good protective coating.
DeleteI love the fact that the furniture doesn't have to be sanded down first. But I'm worried about just using the wax. How durable does this make the finish? I would love to do this to end tables and a coffee table but I don't want the finish to scratch off.
ReplyDeleteChalkpaint is a beautiful thing and I probably wouldn't have tackled this project if I had to sand it, etc. Sheila, the wax provides a protective coat that resists water, stains, etc. Wax is actually pretty difficult to remove, so I think it would be durable for coffee tables, etc. The luster the wax leaves is gorgeous. Just like any other finish, you may have to recoat it many years later if it begins to wear. Thanks for stopping by and let me know how your project goes.
DeleteCould explain alittle more about the wax? I've never used before maybe even the brand you used...piece is beautiful. Connie
ReplyDeleteConnie, I used the Annie Sloan clear and dark wax. You can get it from a local distributor or online. You can also use other paste waxes as well. Some are smoother than others and easier to apply, but all add a great protective coating to protect the finished product. I'm glad you like the piece. It looks better in person than in my pictures.
DeleteBeautiful! I have some pieces I would love to finish like this but I live overseas and can´t get that brand of paint. Do you have any suggestions for sustitutions? Or what is special about this paint? Thanks
ReplyDeleteAnnie Sloan paints originated in England. I would hope you could google search and locate it nearby, but if not, there are recipes out there as well for making your own. I love it because it's so versatile. There is no priming before painting, which is a timesaver. The ASCP colors are gorgeous and the techniques for using it are endless! Good luck!!
DeleteI am happy to be your newest follower...I love this project...and if I can find that brand, I will absolutely try a piece with your technique!
ReplyDeleteJanis: I absolutely love your piece - you did a fantastic job!! I do have a question for you please. After the 2coats of french linen, the one coat of watered old white, are you covering the french linen completely or randomly? The side panels of the armoire are so beautiful, I just cant see figure out how to accomplish with just the french linen and old white (and then the wax)... Thanks so much!!!
ReplyDeleteThanks for your question and kind words Rainey! When I painted with the watered down Old White paint, I wanted to only hit the high parts of the carved and grooved sections, so that the darker French Linen would stay in the crevices. (it doesn't matter too much if some of the Old White gets in the crevices, because the waxing takes care of it) On the sides, where it's just smooth, I played with it until I liked the color. The application of the wax is truly what makes it, I think. The tinted wax mixture is worked into the crevices with a brush and it sticks in the paint brush strokes on the smooth sections, which gave it the uniform overall color finish. Let me know if you have any other questions! Have fun with it!!
DeleteJanis
That is really nice job, you have very good coating on that piece of furniture. your work is admirable, thanks for sharing that with us.
ReplyDeleteI don't understand how's you can get a durable finish without priming the piece first. Does AS make claims that this step is not necessary when using their products? I am all over this project with my own armoire if that's the case! Beautiful job!
ReplyDeleteI don't understand how's you can get a durable finish without priming the piece first. Does AS make claims that this step is not necessary when using their products? I am all over this project with my own armoire if that's the case! Beautiful job!
ReplyDeleteWow! Thanks so much for the step by step instructions with pics and inserts on the pics! I feel like I finally completely understand the ascp technique. It has been a mystery and too vague for me to feel confident about possibly ruining a beautiful piece of unpainted furniture. It's a beautiful armoire and congrats on all the followers! I am your newest fan!
ReplyDeleteOh Thanks so much Denise! I think because this paint is so versatile, there are just a jillion ways to apply it and another jillion combinations and techniques to use on any piece. I always like new FANS!!!
DeleteLove what you did--its beautiful. Quick question-how long did you let the paint dry between coats and then how long did you let it dry before you waxed it? Thank you so much!
ReplyDeleteLove this.
ReplyDeleteJanis, you've been caught having done a fabulous furniture piece and I featured this today. I hope you stop by and check out your feature.
Have a wonderful creative week!
Robin @ Redo It Yourself Inspirations
Stunning!
ReplyDeleteHi Janis, thank you so much for sharing..I love, love ,love your work...I was wondering what the ratio was on your old white/ water...this is my first time and I an a little nervous about it....lol I know we all have to start somewhere.
ReplyDeleteThank you Jani! I think I just eyeballed the old white and water mixture. It wasn't so thin that it was dripping off the paint brush, so probably 75 paint/25 water ratio. You really can't mess it up. Good luck and have fun with it! Thanks so much for your sweet comment.
DeleteThank you so much Janis
Delete..Wish me luck...lol
Janice K
I have the same expensive $$$ armoire in my bedroom. That is a beautiful expensive piece of furniture that I would NEVER destroy. So disheartening to look at this piece. Yes, it is dark and I am attached to mine . I'm sure it is gorgeous. I do love the finish on it. I will probably use this technique on some oak bathroom cabinets to achieve my French cottage look instead of buying new cabinets. Thank you for sharing your techniques with everyone. Very valuable information!
ReplyDeleteOk, well thank you Sue for sharing your thoughts. "To each his own"! Like my post says, I bought this piece second hand and didn't spend $$$ on it. In my opinion, the painted finish brings it up to the Habersham brand level, which is priced in the 10K+ range.
DeleteOk, I am zero artistic and you have inspired me to try this. Question: what type of paint do I use (gloss, semi-gloss, etc. ?). The wax is what type of wax? How long does it take for the paint to dry between coats? Is any brush ok to use? Do you think I could do a bedroom dresser in a few hours? I am totally ignorant here and any advice you give me is greatly welcomed.
ReplyDeleteFor this technique you must use a "chalk paint", not to be confused with "chalkboard" paint. Most brands are sold through small shops or vendors. I used Annie Sloan brand chalk paint and her clear and dark wax. I give more details about colors in the post, as well as how I combined the waxes. Also, I think any good paintbrush will do the trick. The chalk paint dries super quick and a project can definitely be done in a day! You can do it!!! Keep me posted!
DeleteBeautiful piece! Question about the waxing part you did. You put the mix waxes and paint on with a brush but do you wipe it off like you normally do when you wax? Never tried mixing paint with wax so not sure how to do it! Thanks!
ReplyDeleteI just found your website. I have an armoire to paint not quite as ornate as yours and I have been wondering how to paint it. I will try your method as it seems pretty straight forward though I will try to use different colours. I think I will go with Paris Grey, maybe darkened with Graphite. Maybe add some Old White. Not quite sure exactly but I love yours. You did a FANTASTIC job.
ReplyDeleteThis piece is absolutely gorgeous. I just wanted to thank you for probably one of the best tutorials I've ever seen. I have only tried this technique once. I have had so many questions about the technique, products and even weather or not I should use a dry or wet paint brush. After reading numerous tutorials I was left more confused and lost, that I have given up. However this has given me new hope. Thank you so very much!!!
ReplyDelete