Thursday, December 20, 2012

The Stockings are hung...{Burlap velvet stockings}

The stockings are finally hung,
and the Christmas mantle is done!

Wednesday, December 19, 2012

Can You Hear the Christmas Bells Ringing?

My kids aged 4 & 5 playing "dress-up". I hung a backdrop and started taking pictures.
This was taken 11 years ago.

Monday, December 10, 2012

{Mercury Glass} Christmas Hurricane

 How do you decorate your coffee table? 
I've been de-reddening my Christmas decor downstairs, so I needed a new something for the center of the living room.

Friday, December 7, 2012

Vintage Tablescape {Christmas Card Placemats}

 Do you save your Christmas cards year after year?
I have been saving mine for 20+ years. There is a big sack of them in my craft closet, so I decided to do something with them this year.

Sunday, December 2, 2012

Saturday, December 1, 2012

Christmas Porch {Garland}

 It's December, 
and the white lights are aglow!
The countdown is on as we prepare our hearts to celebrate 
the birth of the Light of the World! 

Monday, November 26, 2012

Winter White {Christmas Wreaths}

 I am going for a white Christmas this year!
Translation....
I need to redo most of my Christmas decorations! 
I'm ready for a change, so we'll see how much stuff I can make between now and Christmas Eve!

Thursday, November 8, 2012

{Homemade Granola} in a Jar


I am a HUGE fan of Granola!
I began making it myself when I was trying to lower my sugar intake.
 I found that the store bought granola was always
 WAY TOO SWEET for my tastes.   
I also like to vary the ingredients and try different combinations.

Friday, November 2, 2012

Glare No More {Window Tinting}

 I love large picture windows! In our Living Room, there is a configuration of six windows. The view is of our backyard and covered patio.

Due to last summer's drought, we lost a treasured Burr Oak tree this fall. Sadly, it provided not only lovely foliage, but it shaded our patio and kept the sun from invading our Living Room at sunset. 

After the tree was removed, my husband and I thought about planting another tree. In the meantime, the whole family was getting blasted by the glaring sun each and every afternoon. An immediate solution was needed!

Window tinting became the next viable option. I did my research online, and quickly discovered a favored brand and product. I found rave reviews for Huper-Optik Nano-Ceramic Films window tinting products.

Tuesday, October 30, 2012

Dinner in a Pumpkin...revisited!

 I am celebrating!
It's my One Year blogiversary!!
This was my second post, so I thought I'd share it again,
since NO ONE saw it the first time! 
You can laugh along with me...I don't mind! 

Thursday, October 25, 2012

{Fall Wreath} Porch Decor


 My Fall porch is done!
The wreaths are hung with burlap ribbon...
 The mums have found their spot...
and I am in love with the blue moon pumpkins!

Monday, October 22, 2012

Fall Porch {Lighting}

 Lighting...
it can add drama, interest, and beautiful effects!
I created a hovering grapevine and fall leaf light
for my front porch. 

Monday, October 15, 2012

{Book Pumpkins} Fall Vignette

 Pumpkins, pumpkins everywhere! 
sweater pumpkins, lid pumpkins, burlap pumpkins, jute pumpkins
and it goes on and on!

Wednesday, October 3, 2012

Fall Wardrobe Ideas and {Shabby Apple} Giveaway

THIS GIVEAWAY HAS EXPIRED!
You can enjoy a 10% off your entire order through
October 2012 using the code mentioned below.
Houndstooth Pencil Dress
 The air is starting to get a bit crisp here in South Texas....
or maybe it's just wishful thinking on my part!
But now that it is October, it's time to adjust the wardrobe a bit!

Friday, September 28, 2012

Tabletop {Keepsake} Scarecrows DIY

 I'm just a little excited to share this project with YOU!
I made these scarecrows 
about 10 years ago...
and I LOVE to bring them out each Fall season,
because I made them with my kids clothes! 

Friday, September 21, 2012

Using {Gourds} in Fall Table Decor

 Fall decor usually involves pumpkins, but there is another natural element that I love to incorporate!
Gourds!

Monday, September 17, 2012

{Front Door} Painted Black DIY

 I absolutely love a
touch of black in every room!
When I saw Rhoda's post at Southern Hospitality  
where she highlighted several pictures of
interior doors painted black...
I knew I was ready to just
go with it!

Sunday, September 9, 2012

DIY Fall Porch {Pumpkin Topiary}


I really love to decorate for Fall! There's just something about getting ready for cooler temps, football season,
and the special holidays to follow!

Sometimes all you need is one simple picture to inspire you to create, 
or in this case....duplicate!
My inspiration came after seeing this pic from Southern Living on Pinterest. 
via
I've seen several ideas using REAL pumpkins, but honestly, if I'm going to all that trouble...
I want it to last and be usable year after year!
The craft stores have these "carve-able" faux pumpkins now.
They work great....here's what you need for each topiary:

a small, medium and large carve-able faux pumpkin
a drill with 2 different sized bits
strand of Christmas lights
hot glue
Glitter spray
fall garland with leaves, berries, etc.
sprigs of grapevine

I randomly drilled big and little holes all over the large pumpkin.
 Also, drill a hole in the top, near the stem
for the lights to come through and connect to middle pumpkin.

Drill large holes in middle sized pumpkin...
and top holes for lights.

Drill small holes in small pumpkin...
but leave top and stem in tact!

Thread lights up and through all 3 pumpkins.
Then, begin hot gluing the pumpkins together.
 Finish off with a fall garland, grapevine and a little glitter spray.
I secured the topiaries in my urns with a metal dowel rod...just something to keep it from tipping or blowing over in the wind...
whenever that first coldfront comes in!

  
I also spruced up those urns with a fresh coat of Rust-Oleum Flat protective enamel.  I used this really cool Comfort Grip that Rust-Oleum
gave us at the Haven Conference. Wow...what a difference it made.
It clips on easy and has a trigger that is just as it's named...COMFORTable!!!
 Closeup pic of the topiary with the grapevine, and fall garland.
The first installment of my "Fall Porch" is done!
Painting those front doors is next...
(already painted the inside of the doors and that post is coming soon!) 
If you'd like to see my finished Fall Porch and wreaths, click here,
and to see my post on Fall Porch Lighting, click here.
They look so pretty all lit up....even if it is still 90° outside!
Hurry fall weather!!!!


Tuesday, August 21, 2012

Personalized Drink Bucket {Wedding Gift}

 Let's just say....wrapping presents is NOT my gift! 
I can make a bow, but wrapping presents is just not something
 I've ever spent a lot of time on.
I do appreciate pretty packages!
So, I'm always looking for simple ways to make presents look cute!!

Tuesday, August 14, 2012

Twist Party Streamers and Sweet 16


 There was going to be NO party!
Because she had opted for a "15 1/2" party 
in February with all her girlfriends.
 
The sleepover, eat fun stuff, dance, play games, talk, giggle....
kind of teenager party!

Friday, August 10, 2012

Pina Colada Cake {Sweet Birthday}

 WARNING: This cake is gooey-licious!
It's a bit like a tres leches cake, or a "poke" cake, because you soak the cake in yummy cream of coconut and sweet condensed milk.
Ok, so you've been sufficiently warned. 

Thursday, August 2, 2012

Illuminated {Photo} and Candle Jar DIY

I love to incorporate old photos around the house. There's just nothing quite so lovely as a black and white pic of grandparents or family.

Saturday, July 28, 2012

Shabby {Fabric Strip} Lampshade Makeover DIY


 Some lamps are worth hanging onto...even if the shade deteriorates.
This cute little crystal lamp was a wedding present 20+ years ago.
AND...
it's made by Waterford!

Thursday, July 19, 2012

Minny's Chocolate Pie...Yum!

OK, so I have CHOCOLATE on the brain!
I thought I'd repost this recipe of 
Minny's Chocolate Pie, in case you missed it....enjoy!
The Oscar nominations are out, and to celebrate the many nods that the movie "The Help" received, I'm making my version of MINNY'S CHOCOLATE PIE!  I don't know about you, but I'm hoping for Best Picture!

Monday, July 16, 2012

How to Mod Podge Prints to Canvas DIY

Since we're on the subject of chocolate,
I thought I'd take you into my Master Bathroom, 
which also has chocolate walls.... and show you
a fairly recent project.

Friday, July 13, 2012

Armoire {Painted Furniture} Makeover

Let's just say, any furniture in my house that has a wood finish....
IS NOT SAFE!
I loved transforming this wood armoire into this layered,
painted masterpiece!
And I did it without stripping, scraping or priming.
Yep...you guessed it!
 Annie Sloan Chalk Paint.
(and no, I am not being paid for this endorsement)

If you don't know about this paint, I hope to
educate you a bit in this post, because this is the
first "piece of furniture" that I've painted using ASCP.
Other posts where I have used ASCP can be found here and here.

This armoire is a reproduction piece, so it isn't an antique,
but it has great carving and adornments that made it
a perfect candidate for painting in layers.

I bought it from a friend who didn't have room for it in her new home, and we had just moved in and had this big empty wall across from the bed in the Master Bedroom.

The problem from the beginning was that the wood finish didn't look so great with my "chocolate" colored walls.
And I was NOT going to change my chocolate!!!
First, open your can of paint and begin painting.
(ok, I did have to dust it and tape off the mirror)
I used the color French Linen, which is a medium grey tone. I used my new Annie Sloan paint brush that I won at the Haven conference,
and they are lovely to work with.

Paint and don't worry about the brush strokes...
these will add character later to the finish!
Next, I watered down some Old White paint and put that on over the French Linen
I tried to leave the crevices free of Old White, but because the paint was thinner, sometimes it got in there, but no worries!
The piece was definitely looking a bit ghostly 
next to the off-white trim in the bedroom...
but later, the wax would do the trick!

I then used 220 grit sandpaper, and just sanded in those places and spots that would naturally show wear and tear. 
In some places I sanded down to the wood finish and in others just to the French Linen layer.

Some of the areas were: around the handles, corners and edges that could easily get bumped or nicked over the years, raised decorative areas. 
Then I also picked a few random places on the side panels, just because those get scrapes too.

If you want your piece to look old, you have to study the genuinely old pieces and duplicate.
Then came the wax!
Annie Sloan makes a clear wax and a dark wax.
At the Haven conference, I took an advanced painting class and learned from Miss Mustard Seed that you can mix the clear and dark wax together, instead of using the clear first, then the dark.
This was great news, because it saves a step in the process.

So I scooped out 3 spoons of clear wax, 2 spoons of dark wax, then about 1 tablespoon of French Linen paint.
 (you can also tint your wax with paint)
I mixed it together, and it looked alot like chocolate frosting...lol!

I took the largest of my handy dandy AS paint brushes, dipped it in and began slathering it on. I kept spreading it til it wouldn't spread anymore.
Then I dipped again, and as you can see in the picture above, the difference in color.
 The door and left column does not have the wax applied to it yet.
After the wax dried, which doesn't take very long,
I wanted the "high" areas to show more of the white paint.
To remove some of the dark wax mixture, you simply
use some clear wax.

 So I used an old white t-shirt,
dipped it in clear wax, and began rubbing those
areas that I wanted to highlight.

When you are satisfied with the colors...let the wax dry. 
Then buff with a clean white t-shirt until the entire surface is smooth.

You will begin to see the sheen and no longer feel resistance.
I was blown away by the truly lovely finish the wax gave this piece.
I also painted the hardware with AS Graphite paint.
Brushed on some of my wax mixture, then buffed them as well!
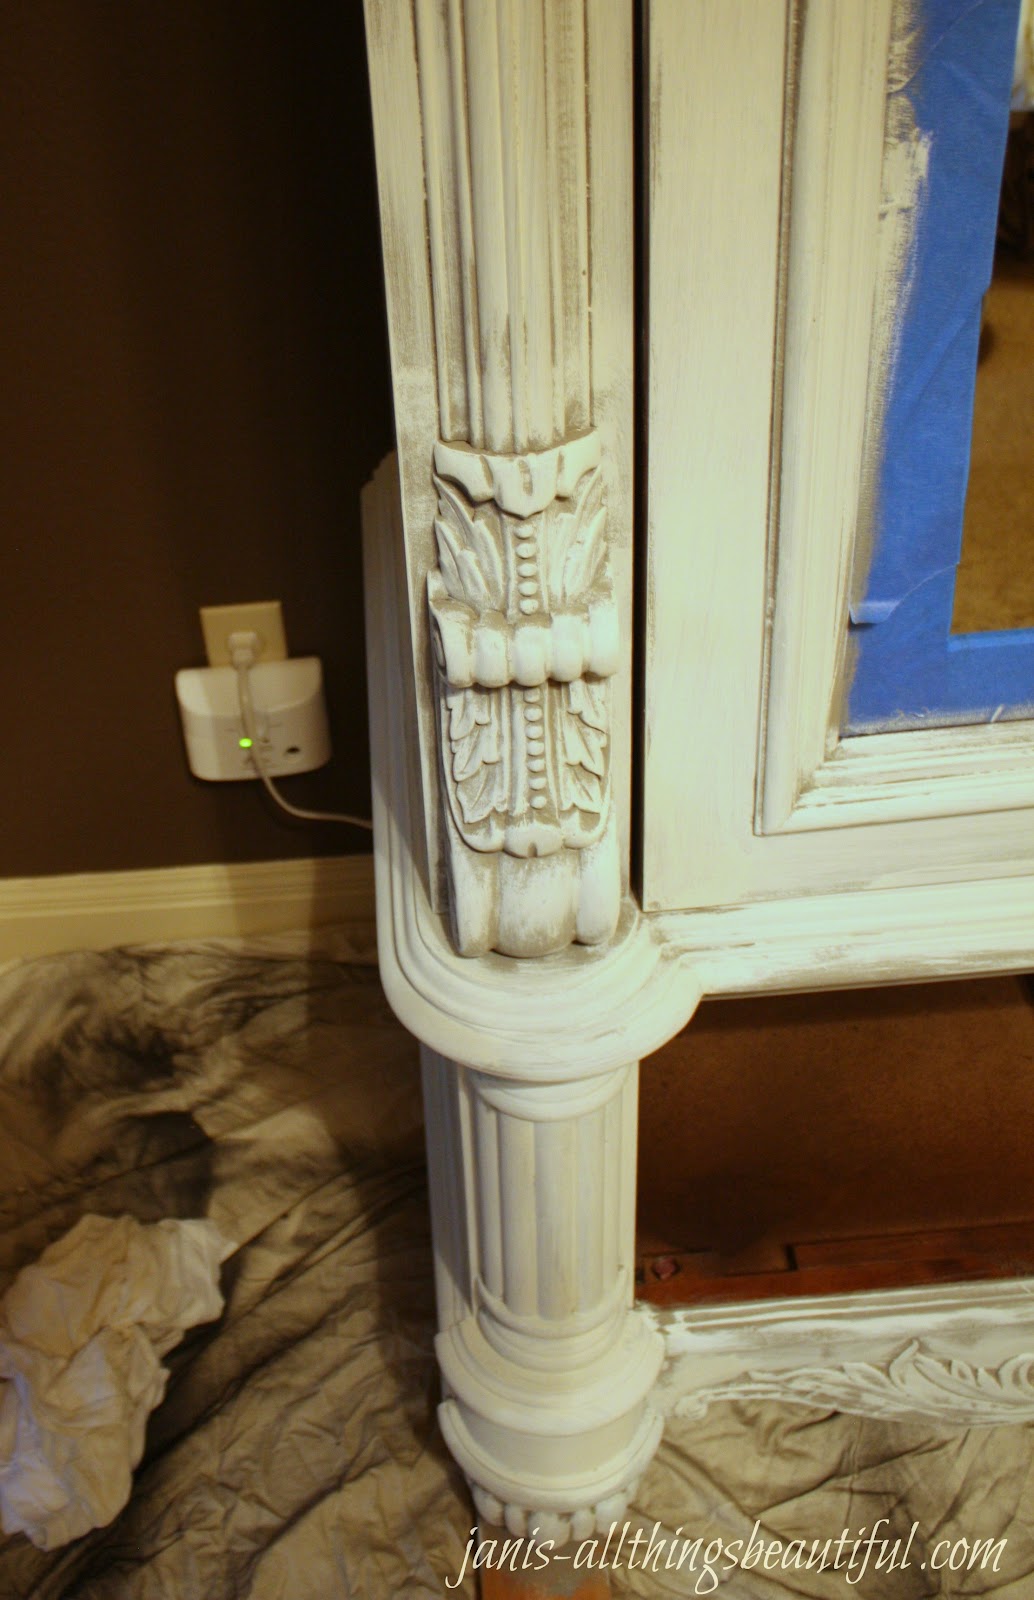
Here you can see some of the details.
 
Here's a closeup of where I sanded to the wood, and took down the dark wax to highlight the white in these raised areas.
Even the side is varied in color, and it doesn't have to be even.
 That's the beauty of mimicking an old painted piece.
Now it pops against the chocolate walls...and it's very reminiscent of 
the high-priced pieces I've drooled over in the magazines!


Monday, July 9, 2012

We have a winner.....!

I would like to announce that
Rebecca Monce
is the winner of the stencil from Royal Design Studio
in the amount of up to $50!

Congratulations Rebecca!!
Keep us posted on what you decide to do with your stencil. 
Love to see others ideas!

Thank you to all of you who entered!

and a BIG shout out to

Royal Design Studio for their generosity!

Here at All Things Beautiful, ...stay posted
I've got a painting project and furniture redo coming up soon!

xoxo

Friday, July 6, 2012

Teenage Boy Room Reveal

 My son's room has been in the works for awhile now, but IT'S DONE!
He had a "cowboy" themed room, and once he turned 13, we began to brainstorm other ideas.

This room has a hodge podge of themes going on, 
like "hunting/antlers", "maps/globes", 
"music/guitar", "rustic", "vintage".... 
 He really liked the idea of sleeping against the wall. We had a trundle bed frame leftover from our daughter's room, so we decided to use that and placed it on the wall with the small square windows.

We found this deep brown duvet cover and shams at PB Teen, grey t-shirt sheets at WalMart, fuzzy pillow at Target, and the serape style blanket online. That set the color scheme!
 There were a few elements that we kept, like this barnwood framed chalkboard. I had made it for his cowboy room, so I repainted the flip side, to have a fresh chalkboard finish.
 I pulled these semi-rusty gym baskets out of the garage...I had picked them up at an antique fair a while back.  Grouped them in a wall arrangement, and put some fun items in there.
 This side table stayed along with his favorite old Ball jar of keys! 
Also, my grandparents old Jiffy Kodak camera.

On the right side of his bed, I hung this old print I found. 
I haven't researched it, but it's a medieval soldier with full armor on. 
I love that the horse is bowing. 
It reminded me of the scripture talking about
 "putting on the armor of God".
 His desk has a classroom map of Europe, from the 50's hanging above it that I found on Ebay, for $8 + $15 shipping! Still a bargain!!
On his desk, I placed this old wooden box, 
that just so happens to have been
used for ammunition. Ha!
If you knew my son, and his fascination
with "how things work"...
you would find this extremely funny!
 Notice one of his books is "Backyard Ballistics"! 
What was I thinking???
 The final touch are the roller shades I stenciled with acrylic craft paint.  
You can find that tutorial here.
My son helped build frames for the small square windows. 
I painted them black, then stapled fiberglass screening and muslin fabric to the back, to filter the sunlight.

Some things you can't see:
 His weight bench is under the chalkboard wall, 
because he's 14 and is working on his "buff".  His electric guitar is on a stand by the left window. His acoustic guitar is usually hanging around by his bed, but it didn't make it into the pic. Neither did his amp and pedals...which are crammed in his right bedside table.

A little bit of "this" and a little bit of "that"!
A TeeNaGe BOy's RoOm!